Audi A4/S4 B7 – LED Retrofit – S6 LEDs

Here is a DIY guide to retrofit S6 LEDs to a B7 (2005.5-2008) Audi A4 S-line or Audi S4. It would be the same process for other Audi A4 models, except that I’m not sure how much cutting would be required to make them fit. I have seen this done on a B6 before (2002-2005.5), but again, it’s just a matter of whether your bumper has enough space – the rest is possible.
The process can be broken into several major steps
- Ordering the parts you will need
- Removing the bumper
- Cutting the bumper & mounting the LEDs
- Wiring the LEDs
- Putting the bumper back on
- Making new lower grilles
A point of caution, before we get started: This is a permanent modification. You MUST cut the bumper. You will lose your fog lights, and you must cut out all of the fog light mounting/support. Do this at your own risk!
- Estimated Skill Level (1 to 10): 7.5 – fairly difficult. You will learn a lot by doing this, but it’s not for the faint of heart. If you are comfortable with a dremel and understand how to strip and connect wires, you should be okay.
- Estimated Hours to Complete: If you’re doing it yourself, it’s probably a 4-6 hour job to wire & mount the LEDs, and another 4-6 hours to make your own lower grilles, so 10+ hours in total. This is a conservative estimate.
Step 1: Ordering the parts you will need
- Ordering S6 LEDs: I strongly recommend buying the OEM S6 LEDs from the dealership, or you can buy them here from OEMPl.us. There are replicas out there, but IMO they are poorly made and do not last.
- Wiring Harness: You can make your own, or you can buy a pre-made wiring harness. I chose the latter route, as the harness was already spliced and diced and included a fuse. A third option is to use the factory wiring for the fog lights, but the problem then is that the LEDs will not work like DRL (daytime running lights), they will work on a switch and you have to turn them on all the time, which I didn’t like. For the purpose of this DIY Guide, we’ll be using this harnessfrom Umnitza for $29.99.
- Lower Grilles: Like the wiring harness, there are multiple ways to do this. You can modify your stock S-line lower/fog grilles, you can order OEM S6 lower grilles and modify those, or you can buy some RS4 type mesh and make your own custom grille. If you want to make your own S6 lower grilles (the method I chose), I explain how to modify the S6 grilles here.
- Mounting Brackets: You can get these from any home depot type store, they are called U nuts and run under a dollar each. You’ll need 6 of them…

- Other tools/supplies & misc:
- Double Sided Exterior Mounting Tape – for the fog grilles, as well as test-fitting/mounting
- Dremel Tool – to cut the bumper
- Plasti-dip or Satin Black Spray Paint – for lower grille modifications
- Bondo – for lower grille modifications
- Crimpers, wire taps, wire connectors, electrical tape – for wiring the LEDs
- Socket Wrench with wobble socket adapter, extensions, & deep 10 mm socket for bumper removal
Step 2 – Removing the Front Bumper
I’m not going to recreate the wheel here, so check this out for a good guide on how to remove the front bumper:
- Thread 1: http://www.audizine.com/forum/showthread.php?t=234131
- Thread 2: http://www.audizine.com/forum/showthread.php?298674
- Other tips I’ve found handy along the way:
- Make sure you use a wobble socket adapter and a deep 10mm socket extension for getting the two bolts behind the fender liner on each side.
- These bolts are really the only hard part as they’re very hard to get to, so the wobble socket and deep socket help out a lot.
- In the second thread above the poster uses a flexible extension, which would be another great idea. Other than these four bolts, taking off the bumper is easy. You don’t need to jack up the car to do this either.
Step 3 – Cutting the Bumper & Mounting the LEDs
Welcome to the point of no return!
- Cover the area with a big blanket or rug so you don’t scratch your bumper
- Pop out both fog grilles (they are just tabs that will release, no tools required)

- It’s Dremel time! Start slow and take your time…cut away the fog light support first. What works best is to cut a little, hold the LED up and see what more needs cut away, and then cut/shave a little more.
- Here are the cuts I made:

- NOTE: You do not have to cut the area closest to the center of the bumper. I did this but in hindsight I probably would have only cut the back part of opening closest to the tires. You CANNOT make these fit completely, at least part of the LED will be hidden behind the bumper. We tried making room on both sides to accommodate the entire length of the LED, but it simply cannot happen. Since some of the LED will be hidden regardless, so you might as well leave the edge toward the middle of the bumper relatively uncut and have most of the extra length hidden behind the back of the bumper toward the tire.
- Here is how the part of the bumper looks nearest the tire, where the majority of your cutting will be:

- You’ll also have to cut some grooves along the top of the fog light area as there are grooves on the top of the LEDs. Making a few cuts will allow the LEDs to lie flush. You can see the grooves I cut in the first picture above and in this picture below:

- Please pardon the cuts aren’t perfectly clean, they were taken before I was completely done but should give you an idea, anyway. These cuts are also invisible to the eye once the LED is mounted, so the don’t have to be perfect.
- And here is the grooves on the top of the LED you need to accommodate:

- Again, this is a trial-and-error process, so just cut/shave a little area, hold the LED up and see if you need to take off more. Less is better.
- Once you’ve got the cuts to where you think you need it, go ahead mount them using the U-bolts and some double sided tape. The double-sided tape will help hold it into place but don’t use too much or it will cause a gap between the bumper and LED. The U-bolts are very tight but you should be able to finesse them on there. I’d also recommend putting a screw through the U-bolts so the don’t fall off, I had a few fall off under pressure as I’d adjust them and whatnot. Here is a picture of how/where to use the U-bolts, where it says “generic clips.” there is a third generic clip that isn’t pictured to the far left.
 Here is another picture of how to mount them:


- Do a test fit and put the bumper loosely back on the mounting points. You’ll see that you need to trim the plastic intake into the side mount intercoolers on each side. Cutting this plastic is easy, but it may cause a slight loss of cooling power. I haven’t noticed this or had any problems with it to date, so I wouldn’t worry about it very much. Here is how I trimmed the plastic intakes:

- You’ll also have to break off a few tabs behind the LEDs. These aren’t really functional and you can break them off with your hands. Here is where the tabs WERE located:

- Once you can mount the bumper without the LEDs hitting anything, Congradulations! The hard part is over. You may have to tweak a few things to get them perfectly flush, but for now sit back and admire your hard work.
- There are a TON of ways you can do this. I tried several methods, and I found the best way to do it was to use a wiring harness from Umnitza, tapping a switched accessory so that they’d always be on like a true daytime running light. The major advantage of wiring to a switched accessory is you can have them on when no other lights are on (e.g. sidemarker, turn signal, etc), and you don’t have to bother turning them on/off. The only disadvantage of this method is that you can’t easily turn off the LEDs while the car is running, unless you disconnect the wiring or remove the fuse. Here are the other options I considered or tried out:
- Using the factory wiring for the fog lights, and then programming it so the fog lights could turn on independent of the headlights using a VAG-COM cable. The disadvantages here: You always have to turn them on/off, which can get annoying. When they’re on, you at least have to have your headlight nob turned to parking lights, so our parking light/turn signal and city lights will be on too – you can never have just the LED on. The major advantage here is that you can turn them on/off by moving the factor headlight dial in the car.
- You can custom wire it and put a custom switch under the steering wheel area. The advantage here is you can turn on/off whenever you want, very easily – and you can leave them on even when the car is off. The disadvantages here is that they’re not automatic and it’s a lot more work.
- You can also do a custom wiring job and have them be automatic, in which case you could probably just tap a fuse using a mini-fuse tap like my Radar Detector Hardwire DIY, and then run wiring and ground to each LED in a series.
- For the use of this DIY, we’ll use this harness found on Umnitza’s website for $29, well worth it – IMO.
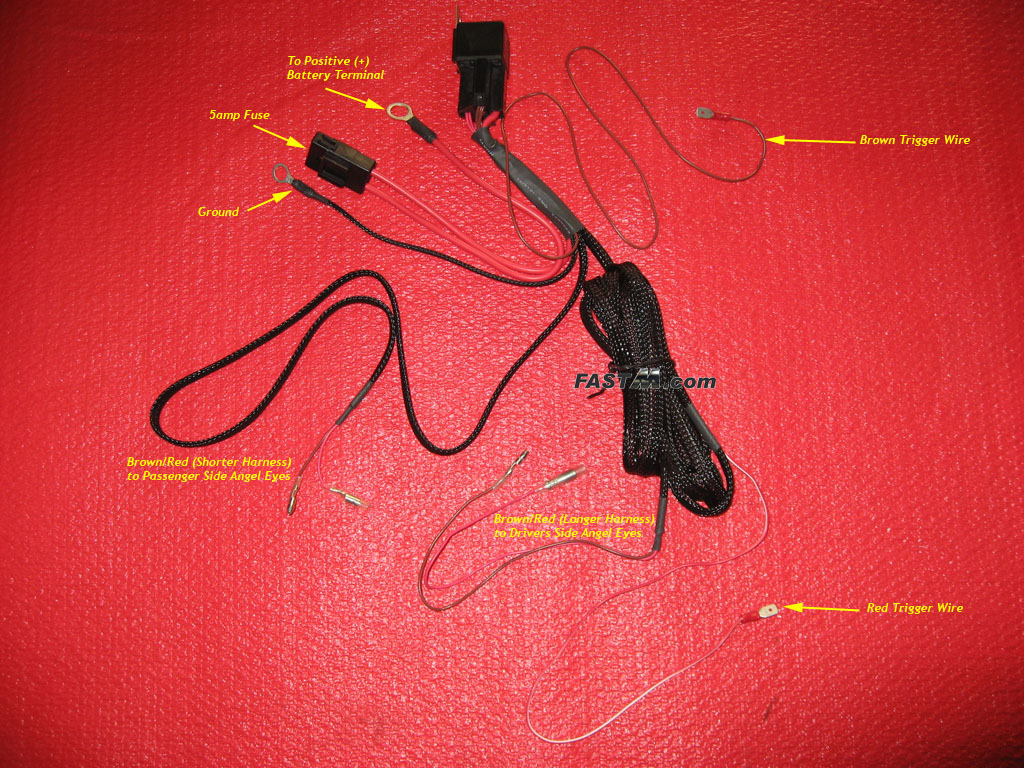
- Here is a great diagram of how the harness works and what each wire does, view it over at FastM.com
- Wiring instructions for the Umnitza wiring harness:
- Connect the ground and positive connections to the battery at the factory locations, and be sure to connect the black ground wire first. You will need to reprogram your key if you remove the factory positive battery cable from the battery, which is as simple as putting your key in the ignition and turning on/off 4-5 times (you do not need to start the car, just turn far enough to turn the battery/accessories on/off). You shouldn’t need to reprogram your radio unless the factory battery cable is removed for longer than a few minutes.
- Run the wires along the passenger side wheel well and be sure to zip tie the fuse and extra wire out of the way of anything hot. The long end of the cable will go the drivers side LED and the shorter to the passenger.
- Wire the LEDs so the red wire of the LED connects to the red wire of the harness, and black wire of the LED to the brown wire on the harnes on both sides. I’d recommend using quick disconnect wire connectors for the LEDs since you will need to unplug them everytime you take your bumper off.
- You can test the wiring first by touching the red trigger wire to the positive battery terminal. Just make sure everything works before going too far.
- Use the included T-tap to wire the red trigger wire to a switched accessory like the Homelink system, so that it will be on at all times, or tap the fog light wiring if you’d like it to run off the factory switch. The Homelink system is the module on the bumper under the drivers side headlight that transmits a signal to open you garage door.
- The brown trigger wire is optional and you can tap another accessory for dimming, or you can choose to tape it off and not use it. I taped mine off and am not using it for anthing.
- The blue wire from the LED can be tapped into the turn signal if you want the LED to turn off whenever you have your turn signals activated, which is how the OEM S6 units work. I didn’t do this as I think it kind of looks wierd on S6s when this happens (almost like a light is out), but it is the more OEM method of wiring these, and possibly safer for other drivers?
- That’s it! Wiring with the harness is pretty easy. As I said, you do have some options on what you tap for the trigger wire, which will change when they’re on. If you tap something thats only on when the engine is running, thats when they’ll be on. Something like the homelink system is on whenever the key is in the ignition and turned to Accessory or more, which I liked better. In theory you could tap your fog lights, your headlights, your stereo, whatever.
Step 5: Putting the Bumper Back On
Follow the instructions to take off the front bumper in reverse order to reinstall it, no need for further instructions. If you find the LEDs still not quite fitting, make sure you trimmed the tabs on the back of the LED and that you trimmed the plastic intakes to the intercoolers sufficiently. It’s a tight squeeze!
I have researched the options here substantially, and here are the three options as I see it:
- Re-use the stock S-Line/S4 fog grilles.You will have fill the hole where the fog lights used to be, make a new bar to go across the top, and cut the height substantially. This is the most custom work, as filling the hole and making a bar to go across it are both pretty heft projects. If you’re competent in fiberglass, this method will have the best, most OEM fitment, and is probably the best way to go.
- Here is how user “TGT” did it on Audizine:http://www.audizine.com/forum/showthread.php?313085-My-Avant-S6-LED-Install-with-Pics
- And another example from user “Enigma” on Audizine:http://www.audizine.com/forum/showthread.php?t=149652
- Example picture:

- Make a custom lower grille using RS4 style mesh – I know the least about this, but if you can source some good mesh, you can probably reuse the outer frame of your stock S-line/S4 lower grilles and fill the rest with mesh. Finding mesh that matches the RS4 mesh is pretty tough, most of what I’ve seen looks like chicken wire…
- Modify the S6 lower grilles – this is probably the easiest method, and I think the S6 grilles look really good creating a lot of horizontal lines that compliment the LEDs and the main grille itself. The only downside here is that the fitment isn’t quite OEM in two corners, although the two spots where it doesn’t fit perfect aren’t noticeable unless you are down on the ground and really looking for them. I also like that this mod uses another OEM S6 piece, making the project just a little more custom and just a little more OEM style at the same time. **NEW:Check out my DIY post on how to make S6 Lower Grilles for your A4/S4


That’s it! You’re done!!
